Showing posts with label part. Show all posts
Showing posts with label part. Show all posts
Monday, March 3, 2014
TV stand Part 2 Almost done
I thought I would finish it up today, but ran into a couple of setbacks. At any rate, heres a second video. I should wrap it up tomorrow!
Read More..

Sunday, February 23, 2014
Homemade DIY Dust Deputy Part 1
I have decided to make my own dust collector for my shop vac, something very similar to the Dust Deputy just cheaper and hopefully just as efficient. I got the idea from a member of Lumberjocks, jcoulam . He built one himself and put a couple of photos on the Internet and basic drawing which gave me inspiration in making my own. I figured I would create basically the same thing and I would provide more photos and descriptions of how it was done.
I went to Lowes and bought a few supplies that I would need.
-1 8"x24" piece of galvanized pipe that is split down the length
-1 new 5 gallon bucket and a lid that fit securely
-1 2 piece of 2" PVC
-2 2" plumbing couplings
-1 8x2 1/2" Shop Vac hose
-1 syringe of 1 min epoxy
-A small amount of self tapping metal screws
-1 tube of caulk
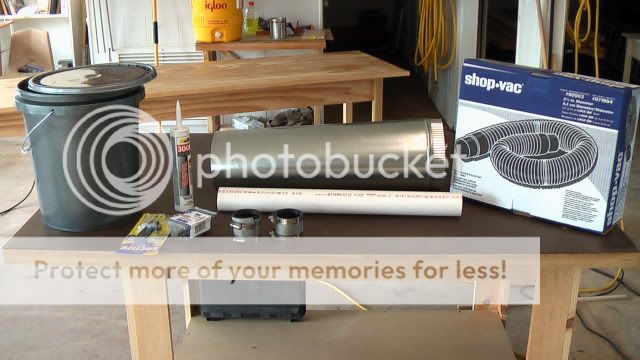
The first thing that I wanted to accomplish was to get the funnel made. I tried it without cutting the piece of pipe hoping to just trim it when I had the final shape and it held securely. This proved to be pretty difficult so I went for a little professional help, my mothers engineer at the truss company who is brilliant at this sort of thing.
We sat down and he came up with pattern that I could lay out on my piece of sheet metal and just cut out my funnel. To do this he used all sorts of math from college that I have forgotten and some odd formulas. In a few minutes we were drawing the cut pattern onto the sheet metal. When I put the cut piece of metal to the test and fastened it together it came out perfect! No cutting necessary. When you screw the funnel together its best to predrill holes in the overlapping piece so that the screws will pull the underside piece tight.
(I will come back and post the dimensions and figures at a later date so that everyone can do this the easy way.)
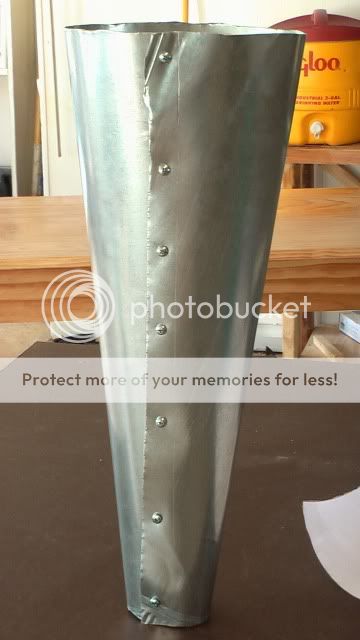
The next thing I did was cut a circle out of a piece of 1/2" plywood that was a little bit smaller than top of the funnel so that it could sit down in the funnel just a grunt. This ended up being about a 7 7/8" diameter circle with a 2" hole cut in the middle of it to allow for the PVC to pass though.
Next I had to cut a whole in the funnel so that a piece of 2" PVC could be inserted at an angle. This wasnt very difficult, I just held the piece of pipe above the funnel and drew what looked like the correct cut on the pipe then whacked it off on the band saw. It really doesnt have to be perfect I dont think, just close. Then I took that piece of PVC with the angle cut and placed against the funnel where it would go through at and traced around the sides of it to give me a hole to cut. Cutting this with my jig saw was pretty easy with a fine tool metal blade.

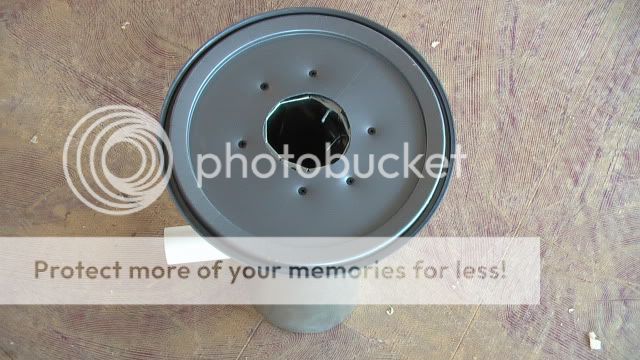
Next I cut another piece of plywood that was a bit smaller than the size of the 5 gallon bucket lid and cut a hole in the center of it large enough to allow about an inch or so if the funnel to pass through it, I think the hole was about 3". Then I cut slits in the part of the funnel that was sticking out and folded them back and screwed it to the plywood. Since I was using wood screws to get a bite in the ply wood I predrilled all the holes in the metal flanges first.

Next I cut a hole in the lid of the 5 gallon bucket and fastened it to the bottom piece of plywood.
Now it was time to start gluing a caulking things. I first used the 1 minute epoxy to secure the piece of PVC in the side of the funnel. Dont put the plywood in the top before doing this because it helps to apply some epoxy on the inside of the funnel here.
Then I caulked around the base of the funnel, the seam in the funnel, and in between the bucket top and the piece of plywood. I loosened the screws between the bucket top and plywood so that I could get a good bit of caulk in here. I sat the funnel upright for the night to let it dry before tightening the screws. The weight of the funnel is pretty good at this point and keeps the joint there decently tight. Now when I tighten the screws in the morning the caulk will act as a gasket (learned that from sailboats although most of you reading probably already know that).

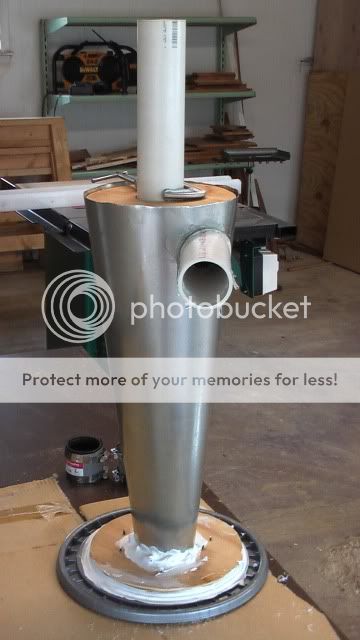
That is all I had time for today and I hope to finish it tomorrow and see how well it works! As you can tell in the above picture I didnt have the top piece of plywood fastened or caulked in place.
Read More..
I went to Lowes and bought a few supplies that I would need.
-1 8"x24" piece of galvanized pipe that is split down the length
-1 new 5 gallon bucket and a lid that fit securely
-1 2 piece of 2" PVC
-2 2" plumbing couplings
-1 8x2 1/2" Shop Vac hose
-1 syringe of 1 min epoxy
-A small amount of self tapping metal screws
-1 tube of caulk
The first thing that I wanted to accomplish was to get the funnel made. I tried it without cutting the piece of pipe hoping to just trim it when I had the final shape and it held securely. This proved to be pretty difficult so I went for a little professional help, my mothers engineer at the truss company who is brilliant at this sort of thing.
We sat down and he came up with pattern that I could lay out on my piece of sheet metal and just cut out my funnel. To do this he used all sorts of math from college that I have forgotten and some odd formulas. In a few minutes we were drawing the cut pattern onto the sheet metal. When I put the cut piece of metal to the test and fastened it together it came out perfect! No cutting necessary. When you screw the funnel together its best to predrill holes in the overlapping piece so that the screws will pull the underside piece tight.
(I will come back and post the dimensions and figures at a later date so that everyone can do this the easy way.)
The next thing I did was cut a circle out of a piece of 1/2" plywood that was a little bit smaller than top of the funnel so that it could sit down in the funnel just a grunt. This ended up being about a 7 7/8" diameter circle with a 2" hole cut in the middle of it to allow for the PVC to pass though.
Next I had to cut a whole in the funnel so that a piece of 2" PVC could be inserted at an angle. This wasnt very difficult, I just held the piece of pipe above the funnel and drew what looked like the correct cut on the pipe then whacked it off on the band saw. It really doesnt have to be perfect I dont think, just close. Then I took that piece of PVC with the angle cut and placed against the funnel where it would go through at and traced around the sides of it to give me a hole to cut. Cutting this with my jig saw was pretty easy with a fine tool metal blade.
Next I cut another piece of plywood that was a bit smaller than the size of the 5 gallon bucket lid and cut a hole in the center of it large enough to allow about an inch or so if the funnel to pass through it, I think the hole was about 3". Then I cut slits in the part of the funnel that was sticking out and folded them back and screwed it to the plywood. Since I was using wood screws to get a bite in the ply wood I predrilled all the holes in the metal flanges first.
Next I cut a hole in the lid of the 5 gallon bucket and fastened it to the bottom piece of plywood.
Now it was time to start gluing a caulking things. I first used the 1 minute epoxy to secure the piece of PVC in the side of the funnel. Dont put the plywood in the top before doing this because it helps to apply some epoxy on the inside of the funnel here.
Then I caulked around the base of the funnel, the seam in the funnel, and in between the bucket top and the piece of plywood. I loosened the screws between the bucket top and plywood so that I could get a good bit of caulk in here. I sat the funnel upright for the night to let it dry before tightening the screws. The weight of the funnel is pretty good at this point and keeps the joint there decently tight. Now when I tighten the screws in the morning the caulk will act as a gasket (learned that from sailboats although most of you reading probably already know that).
That is all I had time for today and I hope to finish it tomorrow and see how well it works! As you can tell in the above picture I didnt have the top piece of plywood fastened or caulked in place.
Monday, February 10, 2014
A House In The Trees Part VIII
With the walls and lower shed roof done, this video documents the clear-story and main roof framing.
I framed the clear-story to accommodate the windows Im going to fabricated using some Kalwall samples I have. Im not yet sure if the main roof will receive a skylight or not, but if it does I wont bother to cut out the rafters within the skylight footprint. It is, after all, just a tree house.
If youd like to catch up on how the Tree House got to this point, be sure to check out these older posts.
Read More..
I framed the clear-story to accommodate the windows Im going to fabricated using some Kalwall samples I have. Im not yet sure if the main roof will receive a skylight or not, but if it does I wont bother to cut out the rafters within the skylight footprint. It is, after all, just a tree house.
An unusual desk project Part II Sylvania Ohio
Ive made all the new pieces for the desk, and Im doing all of the staining and finishing that I can do up front, in the shop. Here are the legs, bullnose, and drawer face on the table...

Ive made a dado joint to connect the two legs together...

Here is the drawer box, with a coat of polyurethane...

And here is the desk top extension. I have attached the transition pieces already, by using biscuit joinery and glue. It will work well for this application.

Next week is the big week to split the existing desk. Sometimes I wish I had a magic wand, but this will be a test of my skill. Keep your fingers crossed!!!
Wednesday, January 22, 2014
The Ply Wooden Boat Part III Construction
We the boat materials purchased, I returned from Lowes. Back in the driveway of the cabin we stay at I set up the saw horses (to realize I’d miscounted 2”x4” and only had enough to make them 24” wide) and got to work.
First I sat on and “tested” one of the plywood pieces which I had ripped to about 30” (I think that’s right, but I should have taken notes) to make the bottom of the boat. I wanted to go wider than the 24” that GardenFork.tv did in order to displace more water and provide more buoyancy. I sat on that piece and pretended to row, testing that it was an appropriate width.
Once I had settled on the width I reviewed the boat bottom with my cousin Robert (who was kind enough to help record the video along with my cousin Nick) we decided that it should have some taper to it at the bow and stern. I marked out the shape with the chalk lines and the casket shape of the boat was arrived on.
The next step was to install the battens which fit where the sides meet the bottom. I used a scrap of CDX to mark out the width of the sides and then used relative dimensioning to size the batten pieces. Each batten piece was sat in a double bead of M-1 sealant and screwed to the base using the Kreg screws.
With battens installed, I cut the sides. Because of the casket shape I couldnt simply use a single, flat side piece as the GardenFork.tv boat had. Rather than make three (3) pieces per side and have that many more battens to install and joints to waterproof, I simply made kerfs in the inside face of the walls at the angle changes. When the sides were screwed to the battens, they formed around the shape of the bottom (though the cupped in slightly at the top).
Next came the stern, which was a simple square piece of CDX. Because it was square, I used it to help fight the cupping that bending the sides had created. The stern was installed by seating it in more M-1 and screwing into battens between the stern and bottom and the stern and sides.
The bow was installed similarly, though because it was installed at 45° to the bottom it took a bit more fudging to install and had much more cupping of the sides to deal with.
Once the sides were all attached, I installed a batten around the top outside edge to stiffen the sides and provide a lip to hold and carry the boat with. I also installed a batten across the top from side to side. This batten was to hold the sides apart and further reduce the cupping at the top of the sides that had resulted from bending them around the casket shape of the bottom.
The last step of construction before waterproofing was to add a keel. My keel is relatively small and oddly constructed. The bracing all around it was necessary to avoid screwing into the ⅜” edge of the plywood. At home, I probably would have dominoed it on. On vacation I had to settle for the Kreg screws (but no Kreg jig) I had brought with me.
Read More..
First I sat on and “tested” one of the plywood pieces which I had ripped to about 30” (I think that’s right, but I should have taken notes) to make the bottom of the boat. I wanted to go wider than the 24” that GardenFork.tv did in order to displace more water and provide more buoyancy. I sat on that piece and pretended to row, testing that it was an appropriate width.
Once I had settled on the width I reviewed the boat bottom with my cousin Robert (who was kind enough to help record the video along with my cousin Nick) we decided that it should have some taper to it at the bow and stern. I marked out the shape with the chalk lines and the casket shape of the boat was arrived on.
The next step was to install the battens which fit where the sides meet the bottom. I used a scrap of CDX to mark out the width of the sides and then used relative dimensioning to size the batten pieces. Each batten piece was sat in a double bead of M-1 sealant and screwed to the base using the Kreg screws.
 |
| Robert carefully considers the shape of the hull. |
 |
| Once the base was cut to size, the sides where the next to be assembled.. |
The bow was installed similarly, though because it was installed at 45° to the bottom it took a bit more fudging to install and had much more cupping of the sides to deal with.
 |
| With the sides, stern and bow installed, it was time for a snack. |
 |
| Some gentle clamp pressure helped un-bow the sides so that I could install the cross batten. |
 |
| Keelly. |
More (Ply)Wooden Boat posts.
Subscribe to:
Posts (Atom)