Sunday, February 23, 2014
Vintage Pieces in varying colors!


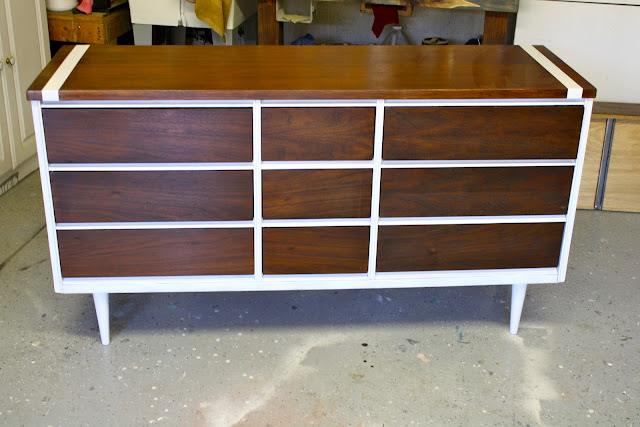

Ok...and #3 is a different looking vintage dresser in Coral!!


 |
| Shhh....still have to wax the sides! I soooooo hate waxing...... |

Wednesday, February 12, 2014
Overcoming Lifes Little Irritants And Making Bigger Ones In The Process
Blackberry | Bluetooth equipped (as per all cell phones these days) |
2007 Ford Fusion | Not Bluetooth equipped - became standard in 2008 (figures) |
Pairing | To set up the common frequency between two devices and establish the encryption they will use to attempt to keep the contents of their communication private |
Pairing Devices | Available aftermarket ranging from $9 to $1000 |
Suitability | None |
Reason | Mounted by suction cups larger than my wife’s bra, clasps that scratch the dashboard piece just showing them to each other, or possible positions result in wiring hanging down in front of the driver |
Conclusion | Make my own |
Result | The following “hands-free” cell phone unit that will mount the phone without damaging the dashboard components and will allow the phone conversation to be heard through the car’s stereo |

Material | Walnut |
Product used | Griffith Hands-Free Microphone and AUX Cable |
Connections | One wire from the phone to the mic, mic plugs into the auxiliary jack on the car’s stereo |
Issue | Fusion has auxiliary jack buried in the console glove box |
Design | Buried the wires between the phone and the mic in the phone’s mount pad, installed the mic in a tower beside the phone, allow the pad to swivel and make everything robust enough to take my wife’s abuse |
Time | 3-hours per day over a 4-day period |
Last procedure | Drilled pad for swivel mount |
Procedures remaining | None |
Reason | Drilled through the damned buried wiring!!! |
Results | None - its pure junk now!!! |
Tuesday, February 11, 2014
Sylvania Ohio built in Step 2


Now back to the job site. Ive installed the cabinet, and made sure it is level. Ive wrapped the upper shelf using the 1x4 trim, which gives it a nice bold look. Ive also face trimmed the rest of the front. The cabinet sets back into the old fireplace cavity which will be finish off soon. The whole thing gives this lower area some dimension.


Monday, February 10, 2014
A House In The Trees Part VIII
I framed the clear-story to accommodate the windows Im going to fabricated using some Kalwall samples I have. Im not yet sure if the main roof will receive a skylight or not, but if it does I wont bother to cut out the rafters within the skylight footprint. It is, after all, just a tree house.
Moving Pictures of Woodworking In America 13
+Marc Spagnuolo took many great videos and after what Im sure was much more editing than I would like to do, he put together this great video on what he saw in Covington.
Dont forget about the +Modern Woodworkers Association Podcast. We talk woodworking with Guests from around the world of woodworking every other week. Subscribe to the RSS feed or iTunes today.
DIY in 1 Hour or Less Removeable Jersey Lampshade cover
When we took pictures for our final CWTS project, we had to get all new accessories (since photos were submitted anonymously), including a lamp because every bed needs light. Not only is it practical, it helps add height to your nightstand, which helps balance the height of the headboard. We had to return the light that we used (we kept a lot of things that we used too) and make our existing lamp work.
Instead of buying a new shade I decided to make a removable lampshade cover that wouldnt damage the shade, in case I decide to use it again.
Jersey is the perfect solution - especially for a tapered shade because it stretches and conforms to the lampshade. It is also great because it requires minimal sewing - only on the connecting end. The top and bottom dont need to be sewn since it doesnt fray.
It is translucent, so white wasnt the easiest choice, but Ill explain how I fixed that in a little.


** I did slightly taper my stitch so that it was a little wider at the bottom. The jersey is pretty forgiving and will stretch, so this probably wasnt necessary. Getting it tight at the top is the most important and then it stretches a little more at the bottom.
4. I sewed one line and cut off the extra fabric. So easy, once I figured out the right settings!
I put the seam of the cover on the seam of the lampshade and then repeated so I had three individual layers. I decided to do the layers separately since it was easier to sew that way (at least for me :)
After the third layer, you could still see through to the shade underneath. I decided that a thin piece of white paper (like normal printer paper) would work well underneath the jersey to hide the pattern. Since the shade is tapered, a large piece of paper would be needed to get one continuous strip. I didnt have any on hand, so I placed a layer of paper towels between the lampshade and the jersey. I couldnt get it out of the height of the paper towel, so they are layered and taped inside. It isnt pretty, but the layers of jersey smooth it out.
Super easy!


Boxing in the Bastard Tool Cabinet
 |
| So many woodworking shows. So little time. |
 |
| Dominoing the top. |
 |
| Thats 23 Dominos holding on the right side. |
 |
| Lots of clamps and clamping squares for good measure. |
Other Bastard Wall Cabinet Posts
Winter Wall Cabinet Wonderland
The Bastard Wall Cabinet (for tools!)
Trudging Towards Tool Storage
Cutting the Cabinet Carcass (in relative terms)
A Home For My Planes
Continued Wall Cabinet Assembly
Whats a Bastard Wall Cabinet without Shelves?
Crown Molding in The Quarry Maumee OH


Spoonflower Im in love
Yesterday while I was searching for fabrics I came across Spoonflower and to say that I am in love is an understatement ...
In case you havent heard of Spoonflower, you can either upload your own design and have them print it on fabric, or shop from existing designs.
Also, you choose what fabric it is printed on, ranging from $17.50 to $38 per yard. Creating your custom design starts at $15.75 per yard.
Here are some of my favorites:





I will definitely ordering from the existing designs or creating my own to be printed soon! Cant wait to try this out!
--
I am back to working on the mirror ... finishing it up has been a little more difficult than expected, almost done, promise :)
Tuesday, February 4, 2014
Custom Built in Bookcase

Thursday, January 30, 2014
6 in 1 woodworking machine
#1: 6 in 1 woodworking machine must see
6 1/8" jointer planer: quiet woodworking precision from sears, Get accuracy, durability and value with this 6 1/8" jointer planer. the craftsman professional 1 1/2 hp 6-1/8" jointer/planer is a precision tool designed for the. Woodworking machine - wikipedia, the free encyclopedia, A woodworking machine is a machine that is intended to process wood. these machines are usually powered by electric motors and are used extensively in woodworking..
Machine king - used woodworking machinery | equipment, New and used woodworking machinery dealer for the wood working industry. our crew at machine king focuses all our attention on giving industrial woodworkers a safe. Buy woodworking machines and tools from busy bee tools, Busy bee tools has the woodworking machines and tools that every serious woodworker is after. with a wide selection of band saws, table saws, planers, jointers. Woodworking equipment: woodworking saws, sanders, presses, Enjoy the art of woodworking with quality equipment including routers, log furniture tools, wood bits, and wood carving systems.. Woodworking tool review: 6" jointers - woodmagazine.com, Some woodworkers consider a jointer a luxury. rather, we call any machine that flattens faces and squares the edges of rough, warped, or oversize lumber a godsend.. Classic machine works - vintage woodworking machines for sale, Classic machine works is located in chambersburg, pa. all machines listed on this site are for sale or sold we’ve been buying, selling and collecting all kinds of. Woodworking equipment and machinery | ebay, Visit ebay for great deals in woodworking equipment and machinery. shop ebay!.
Wednesday, January 29, 2014
Now is Homebuilding and woodworking in colonial america
#1: Homebuilding and woodworking in colonial america must try
American colonial period interior decorating - chazz - squidoo, American colonial is a popular home decor style and one of the main inspirations of today's "country" and "shabby chic" styles of decor. this page will help you. Colonial history, kitchens, and books - replitiques, Background information on the use of pine in colonial america, and a description of the colonial kitchen..

Fine homebuilding - magazine extras, Fine homebuilding issue #241 february/march 2014 videos: the fine homebuilding guide to painting browse our online collection of painting videos, articles, and. Play fine homebuilding's game "the inspector" - fine, Play the latest installment of the inspector. here's how the game works: read the intro describing the problems in the photo to get an idea about what code or safety. Getting shutters right - fine homebuilding article, Avoid these common shutter blunders let’s start with a few things you should never do if you want shutters to have an authentic appearance. first, don’t install. Are replacement windows a waste of money? - fine homebuilding, I’m currently writing a story on the restoration of old wood windows. i’m trying to determine whether or not it’s worth tearing the old units out to install. Dutch colonial architecture - life123, Dutch colonial architecture is very similar to new england architecture.. Restoring an antique timber-frame home - fine homebuilding, I've been a fan of old houses for a long time, and i've been involved in restoring and moving a number of timber-frame houses over the years. in this audio slideshow.


Useful Homebuilding and woodworking in colonial america must try
Homebuilding and woodworking in colonial america ,
Sunday, January 26, 2014
Crowning the built in


Friday, January 24, 2014
The Week in Review
 Busy week ... Lots of stuff went on ... Click the photos to enlarge them ... Will almost finished the half rounds ... actually they are half ovals, which complicated the process even more... The drawers are finished and the bottoms are fitted... Above, he has the first coat of stain on the tops and tomorrow hell sand most of that coat off as it is mainly to raise the grain, and next hell apply the second coat, being careful not to get the inlays too dark ... Varnish Tuesday ... out the door soon ...
  Trevor started a new partners desk project. Its actually for a husband and wife and their new home office in upstate Vermont. We found some really wide (30") mahogany at Irion Lumber that allowed us to make the top and the end panel out of just two boards ...
 The lumber arriving from Pennsylvania ...
 We rough assembled it Friday, did the inlays and built the drawer box ...
 Weve got to finish up the screen porch and the Wagatha racks this week so this one might be on the back burner for a minute ...
 We also got some really fin curly cherry in the same shipment for a dining table and we finalized the design on that this past weekend ... I have a drawing somewhere ...
 And my wood Revolving Door prototype finally bit the dust .. The luann plywood just couldnt hold up to the wind and rain and if fell down piece by piece ... Sooooo ... time for the steel version.
 The wood version was up since early summer and it spun nicely in the wind .. well see if the steel turns more slowly and less violently .. I hope so ...
 I changed the proportions of the rectangles slightly and got the first three together inside the shop today ... It was a rainy Sunday and it seemed like a good thing to do ..
 Were also working on posting items to our new home on www.custommade.com ... We havent tried much online marketing outside of our own website and blog, but given the times, Will and I thought we should try some ... I signed up for a year and well have a lot of photos there by the time were done with it ... What a time sink though ... Hope it works ... I think Im about half posted now ...
 We also made a prototype chair for a clients dressing room ... we made several dark, rich pieces for it a few years back and our client found this Ruhlman inspired design on 1st dibs ... With the clients input and fabric choice, well be doing our take on it in East Indian rosewood.
 The inspiration photo ...
 The bookend raffle went live at the library ...
 And we reviewed some very nice drawings for an upcoming project ... Best shop drawings by an architect ever ... My hat is off to Ramsay Gourd Architects ...
 And, lastly, I dug out a photo of my original Arlington shop that I built in 1976 for a video were working on ... The new owners removed most of the second floor, added a kitchen, a fireplace and a big screened in porch off the back, and it is now a fine guest house for them ... It was a good shop for me ...
All for now .. Back for another week tomorrow ....