Wednesday, March 5, 2014
Woodworking How To For Beginners


Tuesday, March 4, 2014
How To Prepare For A New Finish
Before starting the work, make a thorough inspection of the piece after you have removed the old finish. You may find holes, dents, cracks and other damage that were not previously visible in the surface that will require repairs before preparing for the new finish.
Some of the procedures for preparing the surface are seldom used, but are included to give you full knowledge of them. They are bleaching, scraping, sanding, staining, and filling.The choice of those to be used for a single job are determined by the type and condition of the wood, after the old finish has been removed. Some are necessary according to conditions and some are a matter of choice.
BLEACHING
Bleaching is used today mostly to remove undesirable stains. After the old finish has been removed, any darkened or discolored spots that remain can be lightened or entirely removed by the proper use of bleach. When working with pine or maple, it is best to remove discoloration and freshen up the surface.
Types of Bleaches
There are four common bleaches used by home handymen to lighten wood or remove undesirable stains. They are: PREPARED BLEACH, The simplest method of getting a good bleach is to buy a prepared bleach, which usually comes in the form of two solutions that may be applied successively or mixed together, according to directions on the label.These bleaches are sold in some paint stores or through mail order outlets. HOUSEHOLD PRODUCTS, Sometimes a laundry bleach in which sodium hypo-chlorite is the bleaching agent is effective for such woods as walnut, maple, and gum. Household ammonia is a good bleaching for all but dark woods,however,it is best for spot work only. OXALIC ACID, This bleach works only when a mild bleach is needed. It can be used successfully for such open-grained woods as oak, chestnut, and ash.Some professional strippers use it routinely to remove slight discolorations during the stripping process. HYDROGEN PEROXIDE, Probably the most satisfactory but most expensive bleaches are these based on a strong solution of hydrogen peroxide 30 or 35 percent. This commercial-grade bleach should not be confused with the 3 percent solution used as an antiseptic.
Using Prepared Beach
This two-solution bleach must be intermixed or applied in successive steps. All contain strong chemicals so its important that you wear rubber gloves to protect your hands. An apron or old clothing should also be worn since these bleaches will attack most fabrics and follow the label directions carefully. These are best for overall work. They are difficult to control when spot bleaching. The bleach can be applied with a brush or sponge and should be allowed to dry on the surface until the desired effect is reached. The instructions will tell you whether neutralization or rinsing is required. After bleaching and rinsing is completed, the piece should be allowed to stand until completely dry. Then sand lightly with a very fine sandpaper to remove raised grain. Be careful not to sand more deeply than the bleach has penetrated.
Using Household Products
Most household products are better for spot work. This is how to use laundry bleach and ammonia as bleaching agents. First,apply the product full strength over the spot or surface of the wood. Next, wash the product off with clear water after it has been on the surface about 15 minutes. Check to see if the desired color has been attained. If not, repeat the treatment. When the right color has been achieved, rinse the entire surface with water. Let the furniture stand to dry for at least 48 hours.
Using Oxalic Acid
Oxalic acid can be purchased at a drugstore or in some paint stores. It comes in powder or crystal form. Start by dissolving 1 ounce of powder or 2 ounces of crystals in a pint of very hot water. Using a large brush, apply the solution hot to the entire surface from which the finish has been removed. Let the solution remain for 10 to 20 minutes and then wipe it off with a damp cloth. Repeat if necessary to reach the color you are after. When the proper result is reached, wash off with 1 part ammonia in 10 parts of water. This will neutralize the bleach and stop its further action.Then wash with clear water and let it dry for at least 24 hours.
SANDING AND SMOOTHING
The smoothing of a wood surface is done with sandpaper by first working with relatively coarse papers, followed by those of finer grit. Steel wool is often used for final smoothing.
Rules For Sanding
The sanding of a wood surface is the least difficult of all the procedures, yet it is one of the most important parts of refinishing and must always be done thoroughly and with great care. When sanding, remember these three rules. First always sand with the grain of the wood--never across the grain.Second, use straight strokes with an even pressure, avoiding a twisting or circular motion, and last, use a paper of as coarse a grit as the wood will stand without scratching, then finer ones until the surface is as smooth as the wood will become. After sanding with the finest grit paper, use a steel wool pad for the final smoothing. After using the steel wool, all dust must be removed by wiping with a tack rag. This is a cloth that is treated to attract and hold dust. It is usually available at pant dealers that handle wood finishes.
Many sources an be found at the public library for furniture refinishing.
Article Source: [http://EzineArticles.com/?How-To-Prepare-For-A-New-Finish&id=6713102] How To Prepare For A New Finish
Friday, February 21, 2014
How To Be A Woodworker Woodworking Plans
How To Be A Woodworker
Woodworking Plans
Do-it-Yourself Patterns and Crafts, Woodworking kits, Furniture Plans Plus Much, Much More. Will Show You How to Make 16,000 Different Woodworking Plans. Use The Plans For Fun, Functionality or Profit!
How To Be A Woodworker. Wood is a single of the most attractive, durable and versatile materials that you can operate with although on a do it oneself project. The beauty of a cabinet door that is finished in wood can not be matched by any other material no matter if all-natural or man created. As with any project, you would call for a detailed set of plans whilst you perform with wood and wood primarily based components. This is why it is encouraged that you use a detailed set of woodworking plans as soon as you program to extensively use wood based materials to full the project that you have embarked on.
Now let us examine why woodworking plans are very important in any wood primarily based do it oneself project. To commence with, these plans assistance you eradicate waste. If you start a woodworking project without having a firm program, the probabilities are that you would end up working with additional wood that you originally intended to. Most of the wood primarily based projects would call for in depth assemblies and sub assemblies.
When you start your project, you would be ideally working with individual members of wood and finishing them individually before assembling them. If you do not have the suitable woodwork plans, you could finish up with mismatching wood members at the time of assembly. This could lead to high-priced price and time overruns in the project. All these issues can be avoided by utilizing a effectively laid out set of wood plans.
The other advantage that you could have if you use woodworking plans are that you would be prepared with all the tools and implements that you would demand for finishing the wood based project. Frequently we find that we do not have access to a specific tool in the middle of a woodworking project. This predicament could lead to a loss of time and sometimes you may possibly even have to abandon the project in case a unique tool is not out there. All these difficulties can be avoided if you have a detailed strategy at the onset. How To Be A Woodworker

How To Be A Woodworker Datum
Consistent Advertising - The romance of woodworking will have to have to be balanced with the constant promoting and marketing important to retain the operate coming in. In time, phrase of mouth brings in a lot of operate if you develop a good reputation. Till lastly then, you will need to get the phrase out routinely. Right after the work arrives in you have to have excellent manufacturing systems so you can complete the tasks promptly and continue to maintain the cash flowing. If jobs take into account also incredibly extended and the dollars movement stops, it can turn into difficult to shell out the costs. Talking of dollars flow, you really should build and adhere to common assortment techniques. This is 1 area where by various woodworkers fail. The payment for the execute will need to have to be as vital as the execute by itself. If you are lax in accumulating, you will run into prospects who fall quick to shell out you and this will lead to seriously critical income movement issues.The Compact enterprise - Even having said that you like woodworking, you will need to do the dwelling business enterprise if you are to make a dwelling at it. Superior outcomes commonly needs an in-depth information of both woodworking and small business management. If you under no circumstances have each and every, I recommend you hesitate to leap in until you have honed your enterprise abilities.
Looking back again I recognize that my lack of understanding in the course of my startup rather a handful of decades back could have been offset with some frequent information and a further individual to advise me.Sadly I had to understand most components by trial and error.
Just about just about every and every and just about every week, I take the time to go by choice of the comments that my viewers make about my woodworking web site. 1st of all I want to them for taking the time to comment, I certainly value all of the comments and guidelines. This previous week there was a comment from a gentleman, who expressed a require to get into woodworking. As a man who is passionate about woodworking, I want to welcome him to the fold. And I want to give you him all of the recommendations and encouragement probable in his endeavors.How To Be A Woodworker
More How To Be A Woodworker :
Tag : How Do You How To Be A Woodworker, How To Get Rid Off How To Be A Woodworker, Affordable How To Be A Woodworker, Where To Buy How To Be A Woodworker, Where To Purchase How To Be A Woodworker.
Thursday, February 20, 2014
Furniture Woodworking Plans What to Look For

In the not so distant past, mass produced furniture became popular and would be used, discarded and replaced at an alarming rate. Today, many of us are looking to the simple and more frugal times of our parents and grandparents.
The financial crisis and the damage we seem to be doing to our planet has caused many of us to reconsider our notions of disposable and replaceable materials.
So, it is little wonder then that more of us are reverting to a self-sufficient lifestyle, growing our own vegetables and building our own furniture.
Constructing your own furniture has a number of advantages, not least of which is that by choosing the materials, you can ensure the quality and strength of the item.
But, of course, if you are going to build your own furniture, it is a good idea to start with some good furniture woodworking plans. So, how can you tell if the plans are any good?
There are a number of things that you should consider before purchasing any plans, including:
Have these plans been used by the provider, or are they just copied from another source?
Are you just getting blueprints and designs or is there expert advice, too?
Are there hints and tips on which materials to use?
You may have already noticed that there is a huge range of websites all offering woodwork plans. It is easy to assume that all of these sites are the same, but, on the contrary, they are quite different. So it is wise to do a little research before downloading the furniture plans that you want.
It is highly recommended that you select a site which offers advice from professional carpenters or craftsmen, as this will ensure that the result of your hard work is a functional, suitable and sturdy piece of furniture.
If a site is just offering plans for download, then you have no way of knowing whether the designs will turn out as advertised and, more importantly, there is no port of call for advice should you encounter difficulties.
Building your own furniture can be a relaxing hobby; a cheap alternative to buying shoddy mass produced furniture and can even turn into a business if you find that you have a flare for woodwork. In any of these cases, it is a good idea to obtain the right plans. If you are building furniture for a hobby, then you want your labor and money to produce something worthwhile.
On the other hand, if you wish to earn some money from your woodwork, then it is imperative to the success of your business that you produce high quality, long-lasting furniture. Of course, the key to this is having the best furniture woodworking plans. So, when looking through the various sites that offer downloadable plans, be sure to shop around.
Wednesday, February 19, 2014
Snow today good day to get down to the wood shop and make something!!
Well, its getting cold again and the weather folks tell us that the Twin Cities is about to get clobbered by a snow storm:

Well bring it on--time to get down to the wood shop and go to work!! Yea baby!!
More laminated bowls-Discussion and Plans
For those of you who follow the blog regularly, youll know that I got a giant pile of hickory as a Christmas present last year and Ive been working on using it up. That means using that wood as efficiently as possible so Ive been doing a lot of laminating of late. My latest two efforts revolve around
using up some of the larger flat boards and some of the small pieces that I have so were going to make a medium-sized salad bowl and a nut bowl. Heres how:
Salad bowl
When I laminate wood I generally orient the flat face of the individual wood pieces vertically because I really love the way that this type of laminated block looks. It emphasizes the grain and because laminated blocks are made of separate pieces of wood, I can play around with grain patterns and color. This time however, Im going to orient the faces horizontally like a stack of pancakes.
So Ive dug into the wood pile and extracted several hickory boards on the basis of the width of the board and its color:

And Im going to add a section of walnut that will become the rim of the bowl.
Next, were going to cut these boards into 11 1/2" wide sections on the table saw:


Im going to take this inside and glue it later on today. I think this will result in a very cool looking bowl.
While I was at it I came across that piece of monkey puzzle wood I got for Christmas and I cut it into medium-sized blanks that will eventually become a pair of bowls for some lucky person:


Next, since I wasnt completely frozen through, I decided to take some of the small pieces of hickory that I have and make a blank to make a nut bowl out of.
Hickory is a wonderful wood. The color ranges from butter yellow to deep browns, greens, and even wine reds and pinks and its ideal for any type of wood turning. Its also great for laminations because the color varies so much. So its a very good wood and it also has a wonderful scent. My shop smells great.
I cut up the smaller pieces and assembled them and didnt quite have enough pieces to make the blank as wide as I needed it so I cut more hickory and then I remembered a very thin piece of rosewood that I bought last year:


Even though this is a very thin piece of wood, it was hard to cut it on the table saw.
Here is the bowl stack at present:

Once this is glued up, it will make a very nice nut bowl.
Since its beginning to get really cold, Im going to stop and take the laminating blanks inside so they can warm up. Hickory is a very dense wood and if its too cold, the glue wont dry so everything has to warm up to at least 65 degrees before I can laminate it. Thats ok as I think its time to stop and get something hot to drink.
Im going to glue up at least one of the bowl blanks tonight, probably the nut bowl. As soon as Im ready to put it on the lathe, Ill let you know with another posting.
And another bit of news: I found out Im on the deans list at school--not bad for a wood shop critter!! I think Ill reward myself by going out and buying some red-colored wood!
Thanks for stopping by for a visit. Come back again soon as we always have more adventures in the wood shop. Ill see you soon.
VW
Monday, February 17, 2014
How To Deck Deck Plans Build a Deck
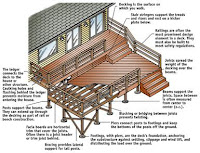
Deck Plans - Build a Deck
A deck will greatly improve your home more attractive and comfortable.Do You Need A Permit To Build A Deck?
Wood Working Excellent Tools To Be Used For WoodWorking Plans
Wednesday, February 12, 2014
hold on to my hat
 well, ok, out of control here. not really, but looking at the pictures below, you might think we were ... there is just so much stuff going on, all at the same time, all different styles and directions, but all cool. above and below are two new belt buckles from sam in the metal shop. the top one was for one of our guides on our montana trip (fish in montana), and the one below was for a local bass tournament that ended recently ... the rest of the stuff below is just a short summary of last week and the rest of the month coming up... click the photos to enlarge them.
 and in the woodshop ... we finished and delivered the dining room this past week; it all looks good and everyones happy, including me ... its always nice to wrap up a big one ...
 it was hard to get it all in the picture, but the light in their room is fantastic in the late afternoon ...
 arm chairs .... very sculptural process getting those arms on there ..
 and the clients threw an eastlake armchair restoration at us at the last minute ... we were all surprised how much we liked it when it was finished ... it had been in the clients basement since they moved in and it was pretty questionable looking when we picked it up.
 and, a friends mom died ... she was a client of mine too and so we made the box for her ashes, which i always consider an honor. we have made a bunch of these and i went back and read one of my blog posts about the process ... glad to do it ... the service was last saturday ...
 and here we have a claro walnut slab desk thats happening now too ... here it is, as of friday afternoon, with the drawer framing just starting ...
 here it is on its feet today. will was doing some banjo work this afternoon and we decided to put the first coat of finish on the top ... more on that piece as we progress ...
 and were watching our friend steve holman make progress on a challenging piece that trevor did some fancy cnc work on. essentially, trevors job was to take the concept of the small handmade model above and convert it to full size. without trevor, it would have been a daunting task of freehand, large scale drawing. changes and adjustments would have been painful ...
 trevor first converted the plan view that steve gave him at 1" = 1, to digital form, and then made the 1/4 scale model you see in mdf above. from there he made many small and subtle adjustments before making plan view templates of the shapes to test the full size fit ups. he then cut the curved plates and forms for steve to build the walls and laminate the applied curved and veneers walls on .
 note the allowances for varying wall thicknesses, handicap, wheel chair access, etc.,etc ..
 full size plates and shoes here
 and friday, we saw some of the full size walls ... its going to be a cool object ...
 and then there are the troublesome bobbin leg tables for an interior designer in northern vermont ... looked easy on paper, yet will warned me it wouldnt be, and, he was very right ... we finally figured we had to make four forms to glue up the 3 piece mid rails or else we would have too many pieces to deal with at once ...
 got it now ... were going to reduce the space between the top two rails to get the joinery and proportions to be better and then all we have to do is make another one, just like it to match ... seems like they are taking forever ... win some/lose some ...
 and then theres the bar cabinet that will is building ... its loosely a simpler version of the art deco macassar ebony cabinet he built a few years ago. hes on the home stretch now ...
 the doors, with their curly maple center inlays, went into the bag friday afternoon .. saw them this morning and they looked good.
 and then theres that $5000. load of wood that arrived from irion lumber last week. 4 dining tables, a coffee table, a corner cupboard and 8 chairs, and some other odds and ends, coming right up ...
 the table and corner cupboard cad drawings ... the client chose the slightly larger version on the left after we sent her a cardboard full size plan view ...
 and theres the cherry trestle table from this post ... coming up soon
 and this morning, in our driveway, was sams new/old 700 pound clausing milling machine that he picked up yesterday from plaza machinery in bristol, vermont ... all we had to do was figure out how to get it out of the truck, into the shop and then off the dolly ... in the end, all it takes is the proper equipment
 and a competent support/cheerleading staff, including uncle pete and his tractor, jennifer and kit.
 getting it off the 6" high dolly and onto the floor was a trick involving about 8 layers of mdf blocks on each corner, removed one at a time ... it felt like we were building the pyramids, in reverse ... lever up, remove, lever down ... got it ...
 and there was still time to help kit plant the garlic ... indian summer here this week ... beautiful.
Tuesday, February 11, 2014
If the chipbreaker does not adhere to iron


likely that the thin chip is stopped between the two irons with
resulting plane mouth clogging. It is therefore necessary to carefully flatten the surface portion of the chipbreaker that
adheres to the blade and ensure a perfect fit between the parties. The problem is that sometimes (if not frequently) the chipbreaker is not regular and after the iron screw has been tight the
blade may show non contact areas, despite having flattened with
care. Being soft iron, we can try to straighten the chipbreaker in the vice but this is a little difficult job.
 Another method is to create a burr on the chipbreaker edge, by which we can close any (small) residual gap. The procedure
 plans to keep the chipbreaker with an angle respect to a flat surface on which we attack a sheet of 150 grit abrasive paper. Move repeatedly backwards until the metal burr forms. So
use a small screwdriver (electrician models have
the right thin measure) and pass it along the contact line between the two iron until they adhere perfectly.
The process takes few minutes!


Monday, February 10, 2014
A Return To Siding
To that end, I installed half of my rake trim last weekend. Today, before I could install the second half of rake trim, I had to finish the last bit of cedar siding on the gable end.
I began by shingling up to the top of the window. I then I fit & soldered the window cap, allowing me to finish the shingles on the gable end.
Its not furniture making, but installing cedar perfections is one of the most relaxing forms of Woodworking I know of. Each piece is fit with a few passes of a block plane and attached with two hand driven nails.
Throughout the day I snuck into the shop and managed to install the jam extension for the first window. It was a good day. Both of my projects moved forward.


