Showing posts with label of. Show all posts

Sunday, March 2, 2014

A Celebration of Spring


Spring has finally sprung and to celebrate its arrival (finally), I couldnt think of better dish to prepare, or share, than Spring Green Risotto. Loaded with asparagus, leeks, sweet baby peas, chives and fennel, it really is a wonderful dish to enjoy with family on a lovely spring afternoon. Happy Spring!
Read More..

Wednesday, February 19, 2014

A Whole Nest Of Dovetails

One of the big jobs in the traditional tool chest build is cutting the dovetails for the carcass. For a while, as I considered the build I was worried that one of my main weapons might not be up to snuff, my Moxon bench vise. I was concerned I wouldnt have enough width. I know I could have pulled it out and measured it to make sure, (I just couldnt remember the measurements off the top of my head) but it seemed more like me to just keep working along and lightly worrying in the back of my mind.

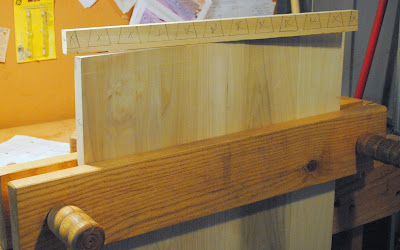
As it turns out, My fears were unbased. The panels are 23 3/4" tall, and I could pass almost 25" in between the screws. A small beginning victory is not a bad way to begin.
Set on top my already slightly taller joinery bench makes the height very nice for dovetailing. No real stooping and lower back pain involved.

Because I wanted to make all four corners the same I decided to use one other old dovetailing layout trick. I made a story stick where I played with and pre-laid out the spacing for the pins and tails.
I transferred the spacing and did a little work with the marking gauge, tri-square, and marking knife. Yes the lines are penciled, but I like to run a pencil in the knife lines, both to help me see and to help things show up better in photos.

Then it was down to some quality time with my dovetail saw.


I love this picture, lines of sawdust as I work my way down cutting one side of every tail. After this I work my way back cutting the other side.


I use a coping saw to remove most of my waste, and then clean up the bottoms of the tail with a little chisel work.


With everything refined, I give the joint a test fit. Only halfway, I dont want to push anything too far and halfway should be enough to tell if youre going to have any real problems.


Repeat another four times, and you have a carcass to glue up.


The next day, after the glue dries. Clean up them tails.


Then you get to work putting a bottom on it.

Ratione et Passionis
Oldwolf
Read More..

Monday, February 10, 2014

Moving Pictures of Woodworking In America 13

I never seem to leave Woodworking in America having taken enough media back with me. This year, though I took plenty of photos, I didnt take any videos (except for some silly Vines). Luckily, many others did take videos.

+Marc Spagnuolo took many great videos and after what Im sure was much more editing than I would like to do, he put together this great video on what he saw in Covington.


+Matt Vanderlist was paying much more attention in Roy Underhills Timber! class which opened the conference. He has this great video showing how Roy squares a log.


On Saturday in the marketplace I was lucky enough to be interviewed by Lee Valley Tools. Connie from their social media team talked with many bloggers and some actual talented wood workers and tool makers. I believe there will be a few videos coming out in the coming weeks. This first one covers what the interviewees would teach kids first. I cant say mine is the best answer (it isnt) but there clearly are some wood workers with a great grasp on how to bring the young into the craft.


Of the silly Vines I shot, here is my favorite. Ive already shared it and Im sorry if youve already seen it. I just cant help buy laugh every time I watch.


Dont forget about the +Modern Woodworkers Association Podcast. We talk woodworking with Guests from around the world of woodworking every other week. Subscribe to the RSS feed or iTunes today.
Read More..

Wednesday, February 5, 2014

The Significance of a Great Woodworking Plans

A professionally penned woodworking plan will save you time.
 

A woodworking plan will save you time. If you know ahead of time what you will do and you can collect the necessary supplies. You will have everything you need based upon the supply list in the plan. Which means no running out mid-project to get some thing that has been forgotten.

A few plans may even give an estimation of how long the project will get. This will help you to plan out your time invested on the project. Have you ever ran out of time in the middle of a project or not been able to complete up because you approximated a project would not take as long as it finished up taking? Along with a plan you will not have to cope with these difficulties.

Having a woodworking plan improves the quality of your projects.

A plan as well tells you what to do step-by-step so that there is no speculating or room for major errors. This is specifically true for newbies. If you are just mastering woodworking skills you need a plan to help you make sure that you are doing everything properly. Even advanced woodworkers dont know every thing and can advantage through following a plan therefore they can prevent errors.

Have you ever tried out to improvise a project? When it is definitely basic then it may have worked out, but typically things never turn out so good. Perhaps you finished up creating something that seemed nothing like the vision in your head or it was not useful because you forgot an essential factor. Along with a good woodworking plan you can make good projects that turn out everytime.

Save money and avoid errors by planning.

On the same note about decreasing errors, you not only save time and improve the quality of your projects, but you as well save money. You will not have wasted wood because you will know precisely how much wood you need and you will know precisely what cuts to make because you can work correct through the woodworking plan.

Using woodworking plans will let you to make better projects in the end. Rather than fumbling around and trying to find things out as you go, you will be ready to go from the begin. There is no speculating and no estimating. You will be able to collect all of your equipment and supplies in advance. You will as well have a clear plan of what to do. You will save time and money and you will create incredible projects.

Woodworking plans allow you totally focus on the real project and not stress about errors, wrong cuts or forgetting essential supplies or equipment. A plan gives you all the info you need so your focus can be on increasing your skills and on making awesome projects woodworking.

Its important to start with a quality woodworking plan when you are starting out on your woodworking projects.

If you want to know more about the above article I recommend you to visit the official site of woodworking plans here...


Woodworking Plans
Read More..

Monday, February 3, 2014

Get north of england woodworking show

Get north of england woodworking show must try

North Of England Woodworking Show

North of england woodworking, power tool show, Hall 1, great yorkshire showground harrogate 21st - 23rd november 2014 the north of england woodworking & power tool show is the largest and longest established. S k promotions - uk woodworking & powertool shows, All visitors are reminded that there are working machines and sharp tools at the show. all children under 16 years of age must be accompanied by an adult.. American patriots and founders - obadiah moore, Daughters of the american revolution plaque placed by peter forney chapter of montgomery, with regent mary buehler in 2009, of alabama and asthon sosi chapter of.

Nelton publications & exhibitions, Publications. information about our various publications, circulation, features etc can be found under "publications". exhibitions. we have a number of shows coming. Woodworking show harrogate 2014 - trade fair dates, Woodworking show harrogate trade fair for woodworking the north of england woodworking and power tool show is recognised to be the biggest and best. Woodworkers : occupational outlook handbook : u.s. bureau, Woodworkers manufacture a variety of products such as cabinets and furniture, using wood, veneers, and laminates. they often combine and incorporate different.

Bbc news - 'entire streets' of roman london uncovered in, An archaeological dig in the heart of the city "will transform our understanding" of roman london, experts claim. about 10,000 finds have been discovered. California kat | a writer of true blood fanfiction, Well, hullo kat, fancy meeting you here… i made a profile just so i could use this pic i took in tivoli!. Beech - definition of beech by the free online dictionary, Beech (bēch) n. 1. a. a deciduous tree of the genus fagus having smooth gray bark, alternate simple leaves, and three-angled nuts enclosed in prickly burs..


Popular north of england woodworking show must see


north of england woodworking show
,

10 out of 10 based on 65 ratings
Read More..

Thursday, January 23, 2014

How to make a planter box out of cedar fence pickets

My wife asked me to make a planter box for our front porch.  I showed her the Ice Chest/Cooler box and said imagine this wider and shallower.  She like the basic idea but wanted it lower to the ground and shallower.  I redesigned the box to fit her wishes and came up with the planter below.  I used 6 - 1 x 6 x 72 cedar fence pickets to make this planter.

I started out by setting up a stop block on my miter saw at 16".

I cut the bottoms off of all 6 pickets to use as legs.  This leaves me with six 56" boards.

I then cut three of these at 39".  These will be used for the sides.  I ripped one board into two 2 1/2" strips.  Each side will have one 5 1/2" board and one 2 1/2" board.

I reset the stop block at 13".  I got three pieces from the leftover after cutting the 39" pieces and then got eight more from two more pickets with the bottom cut off.  This leaves me with one more picket at a length of 56".

This gave me 11 boards to work with.  I will be using 3 for the ends and 8 for the bottom.

I set my table saw at 2 1/2" to rip the legs and the boards for the sides and end.

I ripped four legs at 2 1/2" and one of the 39" sides into two 2 1/2" wide boards and one of the 13" ends into two 2 1/2" wide boards.  I made sure to keep the two pieces of each leg together to make matching legs.

I took the two remaining legs and ripped them to 3" wide to be used in the center.

I left the stop block set at 13" and adjusted my miter saw to 45 degrees and cut both sides of the center legs.

Here are all the pieces cut except for the top frame.

Make sure to make 2 left legs and 2 right legs.

I built the legs using glue, a nail gun, and clamps.

I let the legs sit for 2 hours while the glue set.

Once the legs were dry I put a slight chamfer on all the exposed edges to soften the look and minimize splinters.  I also chamfered the pieces to go on the bottom to help with drainage.


Here are all the pieces chamfered, sanded to 120 grit, and ready for assembly.

I started with the short ends so that the bottom pieces will be the right length to stretch across.  I also setup the legs so that the joint will be facing the short side.  When you look at the long side of the planter you will only see the full 3" side.

I glued and screwed the 13" boards to the top section of the legs.  I put the 5 1/2" section on the bottom.  The floor pieces will be screwed into this so I wanted them attached to a board with more screws in the legs.  I couldnt find any coated deck screws in a 1" length so I had to use drywall screws.

I then took the two sides and glued and screwed in the 39" boards.

I marked the center of the side and the center of the middle leg.

I applied some glue and then clamped it in place.

I then set the planter on its side and pre drilled & counter sunk the holes.

I then screwed the legs to the side..   

All assembled and ready for stain.

I went with a light cherry stain.

I took the last remaining 56" piece of picket and cut it into one 14" length and one 41" length.  I ripped each of those into two 2 1/2" wide boards and then cut the ends at 45 degrees for a frame for the top. 

I attached the frame to the top using glues, 1 1/2" brads and clamps.  I applied a heavy coat of indoor/outdoor spar urethane to the entire planter inside and out.  Please note that the floor has not been installed yet.

The floor consists of seven 13" full boards and one more cut to fit.  I applied two heavy coats of indoor/outdoor urethane to these.

Here is the floor ready for assembly.

Here is the chamfer I made earlier.  I am hoping that this will work for drainage.

I predrilled,

and screwed the floor in.  No glue.

Here is another look at one of the chamfers. 

Once the floor was installed I put one more coat of the spar urethane on the whole thing.  It is now ready to be installed.

Now we just need to put some flowers in it.

Read More..

What Do You Think Of The New Veritas Tools


Peace,

Mitchell

Read More..